
APRIL 2013 CARDS.
 |
| Always a special birthday! |
 |
| Journal Cover farewell gift |
 |
| Using Dies to create a card |
 |
| Special Birthday card. |
 |
| Baby Card February 2013 |
FEBRUARY 2013
THANK YOU CARD

- Stamp background image ( "Postage Due") using the matching ink colour to card stock (or you could use Versamark ink if you do not have a matching colour)
- Embossing contrasting (Pool Party) c/s in the Honeycomb Textured embossing folder. Cut into thirds and use one third for your card. Cut some of the hexagonals off to give a shape that is not rectangular (if you like).
- Use half a doillie and adhere to the top left hand side over the honeycomb c/s.
- Using a third contrast colour (Primrose Petals), punch a scalloped circle and cut in half. Place this on the doilie half.
- Stamp your greeting on Whisper white c/s and cut out. use a square punch to make the flag ends. Attach to your card.
- Embellish with flowers and ribbon.
- By altering colour combos, embellishments, background stamp, and placement of these elements, you would have a variety of cards suitable for male or female and any sentiment.
 |
| So Saffron with Midnight Muse Dusty Attic flower, Pool Partybutton & flower motifs cut from lace tape |
 |
| Sahara Sand with Pool Party Rose from Artisan kit and a fabric rose cut from Flower trim |
HAPPY BIRTHDAY

HOW TO: For 13cm square finished card: Colours Used here- Very Vanilla, Pear Pizzazz (retired).
- Use the full length of A4 c/s in your colour choice. I have used Very vanilla.
- Cut to measure- 26cm x 13cm
- Score at 6.5cm at each end of the length of c/s. Basically folding the two sides in towards each other. (Practice on a scrap piece of A4 paper! I did!! )
- Cut two pieces from the same colour cards stock to measure 12cm x 5.5cm.
- Stamp background image using Illuminate Ink (you will find this on the back page of the New catalogue). I have used "Flowering Flourishes". Any floral image will be gorgeous.
- Cut a slit to take your ribbon about half way along and 1cm up from the bottom edge, of these two small top pieces. Lace your ribbon through the slit and tape to the back of the card stock.
- Adhere this layer onto your outer edges taking care to centre the pieces and you should have a half cm border all around.
- Punch out your flower petals using Creped Filter Paper and 4.5cm Scallop Punch. You will need about 8-10 layers. Sponge the centre of the top two flowers with yellow ink, before piercing a hole and placing an Antique Brad. Spray the flower with Champagne Mist (using a Spritzer bottle from p 179) with rubbing alcohol and Champagne Mist shimmer paint (p158). This gives a subtle shimmer of glitter.
- Punch out a Very Vanilla scallop circle to mount your flower to before adhering it to the left hand side of the card.
- On the inside: Cut another piece of c/s to measure 12cm x 12cm or 11cm x 11cm for a larger border.
- Round off the corners using a punch (if you have one).
- Stamp an image from the same set you have used on the front of your card, using colour this time! Try using markers to colour the flower and stem in different colours, breath on the stamp and place on the c/s. Voila!
- Tie your bow at the front to close your card.
- Stamp a suitable sentiment (if you are using one) that will fit under your flower and adhere using foam dots (dimensionals) to the left! The petals should hold the sentiment in place cross your card.
- TIPS: Use c/s for the flower but scrunch the scallops up before pulling them apart and piercing the centre. Use water to "set" and allow to dry before spraying with mist.
- You could heat emboss the images under the flower using Versamark and clear powder.
I happy to answer any questions if you email me.
Happy Stamping!
BABY CARD September 2012
"Bundle of Love"

Card Stock: Certainly Celery, Whisper White and Pretty in Pink.
Stamp Set: Baby Bundle (p 61 in the new Stampin'Up! (R) Sept 2012-June2013 Catalogue), Itty Bitty Bits (p 100 )
INKS: Basic Black , Certainly Celery, Pretty In Pink
Accessories: Blender pens, double sided tape, Dimensionals* and Two -way glue pen.
Punches: Word Window, Modern Label, Itty Bitty Shapes punches pack, 1" Square. Postage Stamp ( p 182-183 2012-2013 Catalogue)
BIG SHOT: Retired Timeless Type Junior alphabet Dies , Perfect Polka Dots embossing folder (p 189 )
Embellishment: Pretty in Pink Polka Dot Ribbon (p172)
* Foam glue dots from Stampin'Up!
HOW.............
Stamp images from Baby Bundle on to whisper white card stock with the black ink and allow room to punch out.
Adhere to Postage stamp punched in Pretty in Pink.
Colour images using inks and blender pens.
Cut letters from Dies using the Big Shot machine (p 187)
Stamp sentiment and punch out. Mount onto Modern labels in two colour tones.
Using Itty Bitty Bits images, stamp and punch out using circle punch from Itty Bitty Punch pack.
Attach the ribbon around the embossed card.
Attach letters (glue-pen) and stamps (dimensionals).
Finish with little embellishment stamps or buttons*
*Note: Buttons could be used here too!
Hope I can inspire you to create something special for a new baby in your family. :-)
Sharon
----------------------------------------------------------------------
Scrapbook Page... "Sunday Best" May 2012
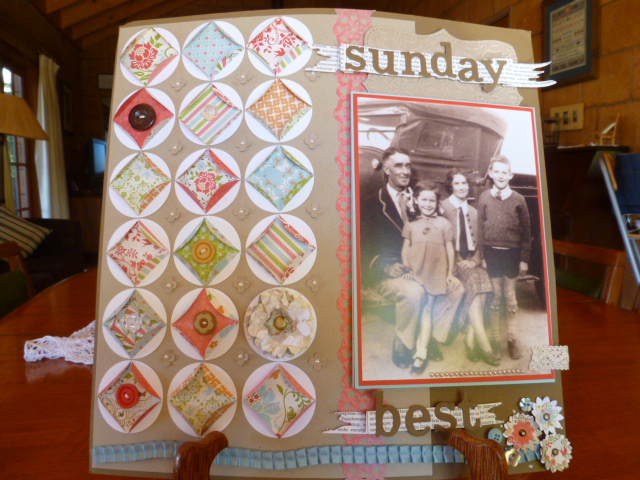 |

Products Used: All Stampin'Up except for the banner die (Tim Holtz) behind the Title letters.
Base: 12" x 12" Soft Suede with A4 cardstock layered on top in Crumb Cake ( or craft) smooth card stock.
Other colours used: Because I chose the papers from 'Everyday Enchantment' the colours were: Poppy Parade and pool Party mainly with whisper white.
Tools: Large circle punch (I used 1 & 3/4" circle punch).
Large Ribbon Border Punch
Boho Blossoms for the smaller flowers
Itty Bitty shapes for the tiny flower with the pearl.
Square punch depending on the size of circle you use. The sqare is used as a template inside the circle to fold in the edges.
Scallop Circle Punch for the large flower that is layered.
Big Shot Top Note Die and Embossing folder was used under the title. And Alphabet Dies used for the title.
How to make the circles: Punch 18 whisper white circles for the bases.
Punch 17 circles from the DSP- at least two of each colour combo, remember the DSP is double sided and they will all co-odinate. 12 will be different and then punch 5 more.
For the flower- punch one or two in whisper white and one in DSP. Make up the distressed flower and adhere to one white circle with a brad. Set aside.
Using your square template..... making sure the corners of the square touch the edges of the circle, fold each side of a DSP circle over the template. I found it easier to score the edges with a fine scorer or stylus. Use repositionable glue dots to place your circles on to the white base circles.
Once you have all 17 circles done, play around with the way they look on the Crumb Cake A4 card stock, placing them sided by side in a grid. Play around with the gap size. To be honest, I just used the repositionable glue dots because once I had it all in place, I didn't want to pull them off again! The flower can be placed anywhere on the grid. I did stitch buttons onto some of the circles using a paper piercer and some crochet cotton and tied it at the back.
I added the tiny flowers in the gaps made by the circles which appears to be the centre of another circle created by the folds.
This is a great technique to use with scraps of paper! So versatile. I can't wait to do this again.I reckon you could place small photos inside the circles if they were bigger.
I hope you give this a go. It looks fiddley but truely wasn't that bad! The effect is worth it.
Have Fun creating....
Sharon
April 2012

Colours: Soft Suede, Pink Pirohette, Daffodil Yellow with Whisper white.
Stamps: "Rue Des Fleurs" from the latest Mini- available until the end of July 2012.
"Teeny Tiny Sentiments" from the IB&C p 105
"Kindness matter" (butterfly).
Inks: Soft Suede.
Stampin Write Markers: Pool Party, Daffodil Yellow, Old Olive
DSP : "Attic Boutique" from the new Mini p17, "First Edition Specialty" DSP p 127 IB&C and the doily is cut from "Flirtatios" specialty DSP , p 127
Lace: "Victoria" p 138 IB&C
Cardstock was sponged with Soft Suede around the edges to soften the white.
ART CARD (April 2012)

This is an Art Card! In other words, you can frame it as an art piece. It started out to be a card but I love the 3D look and before long I had a "picture". I took the inspiration from the SAB "Everyday Enchantment" DSP. The Calypso Coral really does come into it's own. It is a colour that 'grows' on you!
I have used: Early Espresso & Calypso Coral card stock on Crumb Cake card base, with DSP from SAB.
Under the DSP I have used Lucky Limeade ruffled ribbon. Other Elements: Pool Party seam binding,Victorian lace trim, Antique Brad (centre of flower), SAB brad and a normal brad from Subtles collection for flower centres. Flower punches were used to create the ruffled flower. Embosslit Die "Beautiful Wings" provided the butterflies. Pearl jewels to finish!
Denmark Markets

These are my Baby cards....

Let me know if you like them!!
 |
| "Thank You" Card January 2012 |
 |
| "Thanks" Card January 2012 |
VISIT MY INSPIRATION TAB TO VIEW THE PRODUCTS USED TO MAKE THESE CARDS.
 |
| "Thinking Of You" February 2012 |
Pacific Point from Brights collection
Limeade from the latest In-Colour collection
Sahara Sand from Neutrals Paper Stack DSP collection
with a touch of Early Espresso.
(Not quite Old Olive or Wild Wasabi!)
I used the butterflies from "Kindness Matters" because there are always monarch butterflies on the beach flitting amongst the greenery. The bird is from "Nature Walk" (and there are lots of blue wrens in the peppermint trees), as are the stamped images behind the scalloped squares. The words are from "Curly Cute" .
Other elements: Lace trim, polka dot scalloped ribbon, ruffles ribbon, Crumb Cake seam binding, Early Espresso Taffeta ribbon and a doily scrap from "Flirtatious" Specialty DSP.
Scalloped Square Die for the Big Shot was used as well as the scalloped border punch.
Techniques: Edges were inked or distressed (using the cutter kit tool), seam binding was gathered, the bird was stamped using 'rock and roll' to get two tones, fussy cutting and a stapler.
 |
| "Birthday Wishes" February 2012 |
I used Soft Suede, Certainly Celery and Pink Pirohette card stock with Whisper White.
The Stamp Sets were "French Foliage" (p 69 IB&C), "Punch Potpouri" (retired 20110/11) and the words from "Bring on the Cake" -set of Birthday Greetings p38 of the IB&C.
INK colours: Soft Suede, Pink Pirouhette, Certainly Celery.
Embellishments: Crumb Cake Seam binding, Chantilly Crochet Trim, Pearl Jewels.
Other elements: Bird Builder Punch, Decorative Label Punch and Boho Punch (Flower). Dimensionals used to give 3D.
Techniques: Decorative Punch was used for the greeting and then a background punched (in Pink), ends cut off and layered behind the words. The Pearls were used as a bird eye, flower centre and as an added decorative element on the easel "stand".
 |
| Tissue Box cover, February 2012 |
Tissue Box Cover
Designed by Cathy Clark
Cardstock: Marina Mist, Whisper White, Very Vanilla
DSP: Beau Chateau.
Embellishments: Crochet Trim, Early Espresso Taffeta Ribbon, Jumbo Brads, Scallop Circle "flowers", Embossing Folder "Vintage Wallpaper"
Tools: Circle Scissors, Paper Cutter with scoring blade.
Instructions Available : email me at stunstampin@bigpond.com
No comments:
Post a Comment
Please feel free to leave a happy comment. Smile as you do so!